shape
IP Scanner FAQ

Try starting with our frequently asked questions for IP Scanner.
If you still need more help, please email us:

Unfortunately, you can’t. Site licenses can only be used on the version that you download directly from us. We are happy to migrate your current license to the App Store if you wish, but be aware of App Store limitations that enable you to install the app on a maximum of 5 machines! Please email us your original license information if you would like us to migrate you.

Make sure you do not have empty spaces before or after the code when you copy/paste from the email containing your license.


Also, in some situations the Preferences file has become corrupt such that it can no longer be written to and therefore cannot save your license status. To remedy this, you can reset the prefs in the Tools menu, under Debug. Then quit the app, relaunch it, and try entering your license info again. Remember to export any custom device entries that you may have created before deleting the prefs!

Yes, we offer direct purchase for enterprise and large home networks, supporting unlimited devices.


Site licenses for IP Scanner are available for direct purchase here along with an archive of older versions for legacy hardware.

On IP Scanner Mobile, simply swipe the row and tap the ‘delete’ button. On the Mac, right-click the row and select "Remove From List"

With version 3.17 and later, simply hold down the command and option keys when launching the app.


For earlier version you must manually delete the prefs file, found at (your user directory)/Library/Preferences. Then search for anything with the word Scanner in it (depending on which version you have, it will be called IP Scanner.plist or com.10baseT.IPScannerMacPro.plist or 10baseT.IPScannerMacHome.plist or 10baseT.IPScanner.plist). Send that file to the trash, and relaunch the app – IP Scanner will generate a new, clean prefs file.


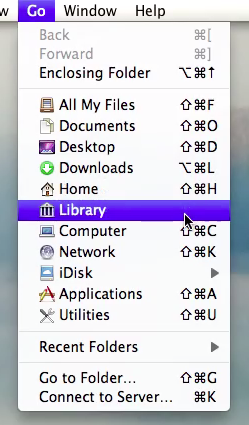
OS X 10.7 Lion users: if you can’t see the Library directory in your user directory, go to the ‘Go’ menu in Finder, and hold down the Option key to reveal the item for ‘Library’. For step-by-step instructions, please see this excellent how-to from Macworld: http://www.macworld.com/article/1161156/view_library_folder_in_lion.html


N.B.: with the new sandbox rules in Mountain Lion, the prefs now live within the sandbox. Actually this is not so bad; the new path to the sandboxed prefs is simply: ~/Library/Containers/


Simply navigate to that folder and delete anything inside that references IP Scanner.


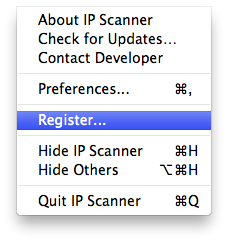
You’ll find the 'Register' option in the IP Scanner application menu. Note: the free version of IP Scanner available from the Mac App Store does not have this option! See FAQ entry #1 above if this applies to you.


IP Scanner can only find active devices with valid IP numbers. This means that for a device to turn up in IP Scanner’s scan results it must actually be ON (and not asleep or “hibernating”) and present on the network. Some devices only access the network briefly and then essentially remove themselves. They will be detectable during the time of their network access and for some time (up to 30 minutes or so) afterwards. Also, IP Scanner cannot find devices that are on different subnets. This means that if IP Scanner is running on a machine that has the IP number 192.168.1.2, it cannot find devices that have, for example, IP numbers like 10.0.1.2.

IP Scanner is built upon a heavily multi-threaded architecture to insure both speedy scan results but also optimal performance in situations where individual probes may take a long time to return results. The operating system (OS X) itself limits the number of individual threads that may be generated to a few hundred. This is normally plenty for typical use, but we have identified one situation in which DNS lookups (part of IP Scanner’s default routine for identifying devices) may become blocked.


Since each DNS lookup is on its own thread, if all of these get blocked by the network it can cause the app to appear “hung” or “locked up”. If this occurs, try launching the app with DNS lookups temporarily disabled by holding down the control, option and command keys simultaneously when launching the app. You may also manually disable DNS lookups from the debug window in the Help menu.


More info: IP Scanner Debug Options


Networks can be amazingly complex; new protocols (and new twists on old ones) appear all the time. We do our best to accommodate many common situations but sometimes the default configuration of IP Scanner may not be suitable for your network environment. For example, multicast DNS provides better information with regards to device names, but does not always reflect actual public DNS records for your network segment.


The Debug window, which is accessed from the IP Scanner Help menu, provides a means for power users to tweak IP Scanner’s behaviour.


What are these cryptic options at the bottom?


DNS: enables DNS lookups. Note: DNS lookups can generate considerable network traffic.

DIG: use DIG for DNS lookups (spawns separate threads) instead of system APIs,DNSServiceQueryRecord(), etc.

LCL: use local multicast DNS queries instead of designated DNS servers

MAC: only display devices that have a valid MAC address

ZZZ: enables support for Bonjour Sleep Proxy detection

NBT: enables scanning for NBT / Windows File Sharing

NDP: enable IPv6 scanning

This is a device that IP Scanner has discovered on the network, but which does not provide enough information for us to supply a reasonable identification. One way to track down devices like this is to google the manufacturer (manufacturer info, if available, is found in the device detail view after double-clicking on the device). Also try running Ping and Portscan against it to see if other clues show up, like what open services the device might be advertising. Once you have determined what the device is, assign it a custom name and badge to help IP Scanner recognize it in the future.

A whitelist is a list of trusted devices. By adding devices you know to this list it will be easier to identify devices you do not yet recognize as the whitelisted devices will be greyed-out and moved to the bottom of the scans list.

A blacklist is a list of devices to ignore. By adding devices to this list they will no longer appear in the scan results at all. You can manage this list by choosing ‘Manage blacklist’ from the tools menu.

The green dots indicate devices that are currently responding and active, as opposed to devices that are passively on the network (ie, the router has given them an IP lease but they are not actually creating any network traffic). To toggle the green dots on or off, use the “Display current Ping status” pref.


N.B.: this feature uses the Ping command to determine whether a device is currently active. Some devices (such as certain versions of Windows) do not by default respond to Ping, and they may consequently not display a dot in the scan list, even though they are currently active.

Blue stripes indicate that this is a manually-added device, as opposed to one that was dynamically discovered via one of IP Scanner’s scan routines. As such, it will always appear in the devices list, whether or not the device is actually present on the network at that time.


N.B.: if this device was added accidentally or if you don’t know how it got there, you can control-click the row to remove the device, if you wish.

In some network scenarios (e.g., segments that use network extenders, deploy the Bonjour Sleep Proxy, or that utilize a proxy arp configuration) multiple devices may appear to share a single MAC address. IP Scanner highlights multiple occurrences of individual MAC addresses to help identify duplicates and false entries.


N.B.: this highlighting of duplicates may be turned off in the Prefs.

If you are handy with an image-editing software package like Photoshop, you may create your own image badges. As of IP Scanner version 2.8 and later you may add custom icons directly by following the ‘manage custom device types’ option from the IP Scanner ‘Help’ menu in the menubar.


Device images should be 256×256 pixels and in PNG format.

Scan results are cumulative within a session (e.g., between launches of the app). If you would like the results to be cleared before rescanning, tap and hold the ‘Rescan’ button for 1 second. There is also a global preference to control this behaviour in the IP Scanner section of the ‘Settings’ app.

IP Scanner Mobile 3.30 & IP Scanner for Mac 3.35 and later include the ability to use custom ‘Open In’ URLs. Simply construct a custom URL and use the wildcards <ip> and <mac> in your scheme to have those values substituted for the appropriate host and mac address when the app is running.


IP Scanner mobile supports a single custom scheme, which can be stored in the IP Scanner section of the Settings app.


IP Scanner for Mac supports unlimited schemes in the form of plugins. An IP Scanner plugin is a text file that uses xml-style markup to designate its various components. At a minimum, it must include these tags: <type>, <title>, <name> and <url> with an optional tag to provide additional information to other users who might install your plugin. IP Scanner plugins must have a file extension of IPScannerLaunchExtension and can be dropped onto a running instance of IP Scanner to be installed. Installed plugins are stored in ~/Library/Application Support/IP Scanner/Scripts and may be removed or modified at any time.


URL syntax examples: http://mygreatwebservice.com/submit.php?ip=<ip>&mac=<mac> vpn://myusername:mypassword@<ip>


Plugin syntax example:

<type>IPScannerLaunchExtension</type>

<name>My Great Web Service</name>

<title>Add Device to My Web Service</title>

<url>http://mygreatwebservice.com/submit.php?ip=<ip>&mac=<mac></url>

<description>This plugin enables you to submit found devices directly to the my great web service!</description>

A request to ping a remote device from the Apple Watch first sends the request to a copy of IP Scanner running on the host network. Apple Watch cannot connect directly to your host LAN; rather, an instance of IP Scanner on the remote network segment performs the ping command on behalf of the Watch client and passes the results on to the watch.


For remote host ping to work successfully, an instance of IP Scanner must be launched on the host network, and the targeted device must be active and connected to the same subnet. When these conditions are met, remote ping results can be viewed on the Watch in near real-time, with a round-trip latency of ~2-4 seconds.

You may import a group of hosts for the purposes of ping, WoL etc.
Generate a plain text file with each device on a separate line in the following format:


IP Number||MAC address||My Remote Host 1
IP Number||MAC address||My Remote Host 2
IP Number||MAC address||My Remote Host 3

NB: all components are separated by two pipe chars ||


If you do not know or need to reference the MAC address field, you may leave it blank, but keep the surrounding separators. In such a case, a valid entry might look like this: 10.1.3.37||||remote server


Example file: example-devices-list.txt

Heino is a German singer of popular music and traditional Volksmusik. For those of you who are not in his close circle of friends, you can catch his act here: https://www.heino.de

shape
DropCopy FAQ

Try starting with our frequently asked questions for DropCopy. If you still need more help, please email us:

For starters, make sure to download the most recent version of DropCopy: /downloads/DropCopy_latest.zip


The next thing to try is to manually select a ‘save to’ destination in the DropCopy prefs on the receiving machine. The previous default location, Desktop, is possibly being blocked by the new sandbox rules enforced under 10.7.5 and later.

This kind of problem is usually related to Bonjour (the auto-discovery technology we use). The problem is that some routers block this networking technology under the pretext of better security. Sometimes you can specifically re-enable Bonjour support (may also be referred to as ‘multicast’) in the router firewall, but if not you may have to go manual and enter each device’s IP number into DropCopy manually.
[NEED TO ADD]
If you’ve checked the firewall, then the problem probably has to do with the auto-discovery mechanism (called Bonjour). One way to debug this is to add the Mac that cannot receive files as a manual destination (using its current IP number) on the Mac you are sending from. You can find the current IP number of the target Mac by looking in the Network control panel in System Preferences on that machine, or by using the “troubleshooting” tool in the Help menu of DropCopy. Remember, you want the IP number of the machine that cannot RECEIVE files, and you are going to use that IP number to create a manual destination on the machine that is to SEND the files.
Make sure both computers (the one you are sending FROM and the one you are sending TO) are on the same network and that DropCopy is launched on both machines. If the machine still does not show up automatically, you may try adding it as a manual destination. To add a manual destination, you need to find the receiving computer’s IP number. On the Mac, this can be done by selecting ‘Troubleshooting’ from the ‘Help’ menu in DropCopy, or by visiting the Network pane of System Preferences. On iOS, the IP number should appear at the top of the screen when you go to the DropCopy ‘Prefs’. Then choose ‘Add New Manual Destination’ from the DropCopy menu (Mac) or ‘Enter a custom destination’ from the destinations menu (iOS).

This is your computer saying that it doesn’t recognize DropCopy’s ‘signature’. Since DropCopy receives data over the network, this makes it suspicious to the operating system. There are a variety of ways that DropCopy may lose its signature, including if you poke around inside the application bundle (e.g., to change the graphics). With Mountain Lion’s ‘sandbox’ feature, changing the pref to have DropCopy run ‘headless’ i.e. without showing up in the dock or app switcher, will invalidate the signature as well.


To accommodate this, we now offer a special “headless” version of DropCopy which has the ‘hide in dock’ preference set already so that it doesn’t need to be changed after the fact. Here’s the direct link:


/downloads/DropCopy_headless.app.zip


You might see the "Do you want the application to accept…" message the first two times you restart, and after that it should be quiet.

Most often this is because DropCopy is not launched or it is launched but the user has moved to a different app using the iPad’s multitasking ability. Unfortunately, Dropcopy cannot currently run in the background on iOS devices (yet). Make sure DropCopy is launched on the iPad and is the foreground app – you need to see its interface in front of you. If you are still having issues, then it’s time to try a variety of different things, starting with trying to send something from the iPad to Mac to see if at least transfers work in that direction.

If you drop multiple files or folders, DropCopy first creates an archive of those files to insure data integrity during the transfer. We have found that this is the most successful way to make sure that the internal structure of folders is maintained, rather than just dumping a bunch of files on your desktop. Rest assured: DropCopy cleans up after itself and removes any temporary files or other cruft after the transfer is complete.


N.B.: “archiving” does not mean that DropCopy is re-compressing video or audio – it is merely putting an archival wrapper around the files as they are.

This kind of problem is usually related to Bonjour (the auto-discovery technology we use). Try changing your Local-Link name to one continuous word: e.g., MikesPowerbook instead of Mike’s Powerbook. You can change this in the ‘Sharing’ tab of System Preferences. Where it says ‘Computer Name:’ at the top is where you should change the name to be one continuous word as described above. On iOS, go to ‘Prefs’ within DropCopy and change ‘My Identity’ in the same manner.
Use the option to display the machine name as well as the user name. This option is found in the normal prefs for the desktop version, and in the Settings app for the mobile version, in the area reserved for other app-specific prefs.
To get access to the preferences in situations where the menu bar is hidden AND the app is hidden from the dock, click once on the drop-zone and hit command+comma (i.e., the apple key + the comma key and the same time.)
By creating your own wifi network! It is a little-known fact that all Macs can create “ad-hoc” wifi networks. This enables you to transfer files between Mac and iOS devices even if you don’t have a standalone router. Here’s how [INSERT]
Yes, but it requires that the destination machine have a “public” IP number, i.e., not be connected to a router that provides it with a “translated” or “private” address. If your destination machine fits that bill, then you still need to know its IP number and add it as a manual destination in DropCopy on the machine that you are sending from. Note: if the IP number starts with 10.0.x.x or 192.168.x.x it is probably NOT a public IP 🙁

Yes, we added this feature as a convenience for power users but the support is very basic; DropCopy is not designed to be a full-featured SFTP client! In particular, once you have validated a remote SFTP path, you cannot afterwards modify or edit it – you must delete it and recreate it. To get SFTP to work in DropCopy, the syntax must also follow precisely this schema:


If your sftp url is sftp://myserver.com/virtual/myuser


Choose ‘add SFTP destination’ from the tools menu. In the window that appears, put myserver.com in the host field, and /virtual/myuser/ in the remote path field. Hit the ‘validate’ button. If the path is valid you will be prompted for a username and password.


N.B., this feature is not available on the App Store version of DropCopy for reasons related to Apple’s sandbox rules. If you need this feature please download DropCopy directly from us at /downloads/DropCopy_latest.zip

Not yet, but if you are technically inclined you can make one yourself by creating an application that implements the DropCopy protocol, which is open. Contact us for more information if you want to have a go.
The song goes into your incoming files folder just like other documents. There is currently no published way to add outside songs to the iTunes database on your iPod from the iPod itself. You can listen to the song, however, using the ‘quicklook’ feature. Simply click on the quicktime icon next to the song in your incoming files folder.
Tap to the right of an item where you see the “more options” icon (rectangle with an arrow) and then select ‘Open Other’.
Try changing the pref in DropCopy on the Mac to NOT preserve resource forks by default. Leaving this preference enabled causes DC to first make an archive of the file (to preserve the resource fork) which is then registering as a folder to mobile DropCopy.

Mac: highlight the destination in the list and hit the delete key.


iOS: swipe the row and tap the delete key.

Mac: move the application into the trash and empty the trash.


iOS: press and hold the icon from the home page until it jiggles. Then tap the black X that appears above the app.

Drag your files to the menubar icon at the top of the screen instead of to the desktop drop zone.
You probably dragged to the dock icon or application icon instead of to the drop zone or menubar icon. When you launch DropCopy it puts a small, circular ring in the upper-left corner of your desktop – this is where you drag files to be copied. If the drop zone is obscured by open windows, you may also drag your files to the menubar icon at the top of the screen.
When you drag onto the drop zone, a list of destinations will pop up. You need to continue dragging the file until it is over the actual destination, even if there is only one destination listed. Simply dropping the file on the drop zone will not initiate a file transfer.

With version 1.92 and later, simply hold down the command and option keys when launching the app.


For earlier versions you must manually delete the prefs file, found at (your user directory)/Library/Preferences. Then search for anything with the word DropCopy in it (depending on which version you have, it will be called DropCopy.plist or com.10baseT.DropCopyMac.plist or com.10baseT.DropCopyProMac.plist)


N.B.: from Lion onward, Apple has made it harder to access your user’s Library folder (it’s hidden by default). If you are not sure how to find it, please have at look at these exhaustive instructions from Macworld: http://www.macworld.com/article/1161156/view_library_folder_in_lion.html


N.B.B.: with the new sandbox rules on Mountain Lion, the prefs now live within the sandbox. Actually this is not so bad; the new path to the sandboxed prefs is simply: ~/Library/Containers/


Once you navigate to this directory, simply look for any folder that references DropCopy and delete that folder.

Some forms of custom icons that are stored in the ‘resource fork’ of a file are not transferred by default. If you need this data for specific file types, simply hold down the option key when dragging the file to the drop zone. DropCopy will then encapsulate this data into an archive and send that along with the file.

OS X versions 10.7 and later work differently with regard to multiple desktops than under Leopard or Tiger, and you have to specifically tell the system to put DropCopy on all of them. Here’s how (from MacRumors):


Right-click (control-click, two-finger-click) on an application icon in the Dock. In the Options menu that appears, you’ll see three choices related to Spaces:


– Assign To All Desktops

– This Desktop
– None

Originally from: macrumors

Yes, we offer direct purchase for enterprise and large home networks, supporting unlimited devices.


Site licenses for DropCopy are available for direct purchase here along with an archive of older versions for legacy hardware.

shape
IP Scanner FAQ (DE)

Beginnen Sie mit unseren häufig gestellten Fragen zu IP Scanner. Wenn Sie noch weitere Hilfe benötigen, senden Sie uns bitte eine E-Mail:

Das geht leider nicht. Einzellizenzen können nur mit Versionen verwendet werden, die du direkt von uns herunterladen kannst. Wir können auf Wunsch deine Lizenz im App Store migrieren, aber beachte die App Store Beschränkung auf maximal 5 Geräte! Sende uns deine originalen Lizenzinformationen per E-Mail.
In manchen Fällen ist die Einstellungsdatei kaputt, schreibgeschützt oder kann den Lizenzstatus nicht speichern. Du kannst die Einstellungen zurücksetzen im Tools Menü, unter Debug. Beende das Programm, starte es neu und gib die Lizenzinformationen erneut ein. Vergiss nicht vorher eigene Geräteeinträge zu exportieren bevor du die Einstellungen löschst!
In IP Scanner Mobile, ziehe den Eintrag nach links und drücke auf “Löschen”. Auf dem Mac, klickst du mit der rechten Maustaste auf den Eintrag und wählst “Aus der Liste entfernen” aus.

Die IP Scanner Einstellungsdatei findest du in (Benutzername)/Library/Preferences. Suche nach etwas mit dem Wort “Scanner” (versionsabhängig heißt diese “IP Scanner.plist”, “com.10baseT.IPScannerMacPro.plist”, “10baseT.IPScannerMacHome.plist” oder 10baseT.IPScanner.plist). Wirf die Datei in den Papierkorb und starte das Programm neu – IP Scanner generierte eine neue, saubere Einstellungsdatei.


OS X 10.7 Lion Nutzer: Wenn du das Library Verzeichnis nicht sehen kannst, halte die Options-/Alt-Taste gedrückt und wähle das “Gehe zu”-Menü des Finder, dort wird das Verzeichnis ‘Library’ angezeigt.


Anmerkung.: Mit den neuen Entwicklerrichtlinien (Sandbox) in Mountain Lion, befinden sich die Einstellungen im Programm. Das neue Verzeichnis für Sandbox-EInstellungen ist einfach: ~/Library/Containers/


Einfach in den Ordner wechseln und lösche alle Inhalte im Ordner IP Scanner.

Im IP Scanner Menü findest du den Eintrag “Registrieren…”. Notiz: Die freie Version von IP Scanner im Mac App Store hat diese Option nicht!
IP Scanner kann nur aktive Geräte mit vergebener IP-Adresse finden. Das bedeutet, dass das Gerät muss eingeschaltet (kein Standby) und im Netzwerk verbunden sein um in IP Scanner erkannt zu werden. Einige Geräte verbinden sich nur kurz mit dem Netzwerk entfernen sich selbst. Diese werden im Zeitfenster der Verbindung erkannt (bis zu 30 Minuten) oder anschließend. Ebenso kann IP Scanner keine Gerät finden die mit anderen Nertzwerken verbunden sind, dass bedeutet der IP Scanner auf einem Computer mit einer IP-Nummer 192.168.1.2 keine Unternetzwerke wie z. B. 10.0.1.2 finden kann.
Das ist ein Gerät, dass IP Scanner im Netzwerk entdeckt hat, aber nicht genügend Informationen beinhaltet um eine angemessene Identifikation zu liefern. Ein Möglichkeit das herauszufinden ist den Hersteller im Internet zu suchen (Herstellerinformationen, wenn vorhanden, befinden sich in den Gerätedetailsansicht nach einem Doppelklick auf das Gerät). Weitere Möglichkeiten sind Ping und Portscan um andere Hinweise zu sehen, wie offene Dienste die das Gerät ansprechen (z. B. SSH, HTTP, FTP). Wenn du das Gerät bestimmt hast, weise es einen benutzerdefinierten Namen zu und übernehme es, damit IP Scanner es zukünftig erkennt.
Eine Weiße Liste ist eine Liste mit vertrauenswürdigen Geräten. Durch das Hinzufügen von Geräten in die Weiße Liste fällt es dir leichter Geräte zu identifizieren – erkannte Geräte werden grau und am Ende der Scanliste dargestellt. Die Weiße Liste hilft dir die Übersicht für unbekannte Geräte zu bewahren.
Eine Schwarze Liste ist eine Liste mit ignorierten Geräten. Durch das Hinzufügen von Geräten in die Schwarze Liste erscheinen diese nicht mehr in den Scanergebnissen. Du kannst die Schwarzeliste im Tools-Menü unter “Schwarze Liste konfigurieren” bearbeiten.

Die grünen Punkte weisen auf reagierende und aktive Geräte hin, im Gegensatz zu passiven Geräten im Netzwerk (z. B. der Router vergibt eine IP-Nummer, aber sie erzeugen keinen Netzwerkverkehr). Zum An-/Ausblenden der grünen Punkte wähle in den Einstellungen “Ping-Ergebnisse anzeigen”.


Anmerkung: Diese Eigenschaft nutzt der Ping Befehl um die Aktivität eines Geräts zu bestimmen. Einige Geräte (wie bestimmte Versionen von Windows) reagieren nicht auf Ping, und zeigen demzufolge in der Scanliste keinen Punkt an, auch wenn sie aktiv sind.

Blaue Zeilen zeigen eigens hinzugefügte Geräte an, im Gegensatz zu dynamisch Gefundene aus den IP Scanner Routinen. Sie werden immer in der Geräteliste angezeigt, egal ob sie im Netzwerk aktiv sind oder nicht.


Anmerkung: Wenn das Gerät versehentlich oder unbekannterweise hinzugefügt wurde, klicke mit der rechten Maustaste oder gedrückter CTRL Taste auf das Gerät und wähle “Entfernen”.

Wenn du mit einem Bildbearbeitungsprogramm wie Photoshop vertraut bist, kannst du eigene Bilder erstellen. Seit der IP Scanner Version 2.8 kannst du ganz einfach die Bilder hinzufügen im Verzeichnis ~/Library/Application Support/IP Scanner/Devices/


Gerätebilder müssen 36×36 Pixels und im PNG Format sein.


Wir bitten dich dein neues Bild der Allgemeinheit zur Verfügung zu stellen. Reiche dein Bild hier ein.

Scanergebnisse sind in einem Durchgang aufbauend, z. B. zwischen dem Starts des Programms. Wenn du einen sauberen Neuscan möchtest, halte den “Scan”-Knopf für 1 Sekunde gedrückt. Es gibt auch eine allgemeine Einstellung für dieses Verhalten im IP Scanner Bereich der Einstellungen.
Heino ist ein deutscher Schlagersänger und Volksmusiker. Für alle die, die ihn nicht kennen, können ihn hier erleben: https://www.heino.de
shape
Video Playlist Manager FAQ

Try starting with our frequently asked questions for Video Playlist Manager. If you still need more help, please email us:

Currently, you may import media files into Video Playlist Manager in one of six ways:

  1. Use the ‘File Sharing’ feature in iTunes. Video Playlist Manager will appear under the ‘Applications’ tab when you sync your iPad with iTunes. Click to highlight it, then drag files in the adjacent ‘Documents’ window. For more info, see: http://support.apple.com/kb/PH1780 or this tutorial with images from the Mac Observer: http://tinyurl.com/d6zdta4.
  2. Use the ‘open in’ feature available in Mail and in many third-party apps, such as GoodReader.
  3. Use the ‘import files’ feature in this app to import images and videos directly from your Camera Roll.
  4. Use our free Mac file transfer tool, DropCopy. For more info, see: /macintosh-software/dropcopy/. Once you have DropCopy installed and running on your Mac, launch Video Playlist Manager on your iOS device. Now you may drag individual clips onto the DropCopy circle on your Mac and they should be sent over WiFi to your mobile device. You will see a progress bar in VPM showing the transfer status.
  5. If you are a DropBox customer, simply enable DropBox support from the ‘Playlists’ tab in the Settings app. This will create a ‘Video Playlist Manager’ folder in your DropBox into which you can add compatible .mp4 videos, PDFs, Word documents and JPG or PNG image files. These items will be synced to VPM the next time you launch the app.
  6. If you use iCloud drive, enabling iCloud support from the ‘Playlists’ tab in the Settings app (enabled by default) leads to the creation of a new folder in your iCloud drive into which you can add compatible .mp4 videos, PDFs, Word documents and JPG or PNG image files. These items will be synced to VPM the next time you launch the app.

Look for the sort handles to the right of each row.

Tap and hold the sort handle until the row appears to lift out of its position in the list. While still keeping your finger on the sort handle, move the row to the desired position in the list.

iPad only supports video clips of a certain size and bit-rate (this is a limitation of the iPad, not Video Playback Manager). There are a number of free applications that convert video clips into the proper format. We usually use Handbrake and select the iPod Touch preset. Also, Apple’s own Quicktime player provides for conversion to the proper format (as a rule of thumb, if there is no iPad-specific option, the iPad and iPod Touch can be considered equivalent in terms of which settings to use when exporting).

iPad: To delete or modify media files you must select the MASTER LIBRARY from the left sidebar. Then you may either tap the gear icon to the right of each item, or you can swipe the row from right to left to bring up the delete control.


iPhone: From the Playlist Options menu in the Manage Playlists tab, select Delete Clips. Tap the delete control to the left of the item you wish to remove.


Tap to confirm the deletion.

Running playlists may be stopped in two ways:


Triple-tap the screen. The currently playing clip will fade out and you will be returned to the control screen.


Single-tap the screen to reveal the playback controls; then tap the ‘Done’ button in the upper toolbar (iOS 5) or the ‘Stop Sign’ icon in the lower toolbar (iOS6).

Apple TV’s streaming protocol is not particularly flexible: once a video has finished, Apple TV generally dumps you back to its default interface before accepting the next stream. However, if you engage mirroring mode (in which your iPad’s entire screen is mirrored on the TV) then you can successfully play a playlist with multiple clips and looping, because the video clip never technically stops (to the Apple TV, the stream just keeps going).
Yes. Swipe left with TWO FINGERS to skip to the next clip and swipe right with TWO FINGERS to return to go back to the previous clip.
Interstitial slides are fullscreen slides that appear between clips in your playlist. These are typically used to display a fullscreen ad or logo. You may select the length of time that the slide is shown before advancing to the next clip in your playlist by tapping the ‘Slide’ button. Slides may be selected from your existing photo library, or you may copy an image directly into the Playlist Manager application via iTunes, as you do with video clips. If you copy an image directly, the image must be named “interstitial.png” to be recognized by the system.
A watermark is an image that floats in front of your videos while they are playing. Watermarks typically depict small logos or other branding elements. Video Playlist Manager prefers an image in the .png format to provide for a seamless integration with the video content. After importing the watermark image you may resize and position it to further customize its appearance by tapping the ‘Watermark’ button. Watermarks may be selected from your existing photo library, or you may copy an image directly into the Playlist Manager application via iTunes, as you do with video clips and interstitial slides. If you copy a watermark image directly, instead of selecting it from your photo library, the image must be named “watermark.png” to be recognized by the system.
CONTACT US: